Hello readers!
So, unfortunately, I don't have a job (yet) to fill up my holidays. Not that I haven't been trying, it's just been difficult to find time to apply for jobs, seeing as I've been drowning in homework and tests from CreComm these past couple weeks.
But yesterday, I decided what I was going to do to fill up my three weeks instead.
I'm going to make cake pops.
I'm not sure where the idea came from yesterday, but I suddenly had an overwhelming urge to make cake pops.
After looking up recipes, I've found that they're actually pretty basic to make, but the number one complaint is that it is very tedious. This is due to the fact that they have to be frozen and unfrozen a number of times, on order to keep them nice and firm.
Thankfully, though, I will have a lot of time on my hands.
I plan on making my first batch early next week, and I will be picking up all my ingredients tomorrow. I have to run around to a bunch of different stores (Walmart, Bulk Barn, and possibly Michaels) in order to get all my ingredients, and as they are pretty far away from me, I figured it be best to do my shopping on a separate day. That way I can spend a whole day just happily making cake pops!
My first batch will be primarily for my boyfriend, Nic. He's had a much crazier time than I have these last few weeks. He had a number of massively massive projects due, most being at least 50 pages long, and he still has exam week. So I plan on delivering a good chunk of my first batch of cake pops to him while he is studying for his exams at school - enough for both him and his friends.
Considering one box of cake mix makes about 50 - 60 cake pops, I've decided that I'm going to make four different kinds for my first try: Plain white (with maybe some cinnamon), candy cane, lemon, and strawberry. I really wanted to make some with a chocolate base as well, but I don't feel up to making two boxes of cake for my first attempt!
I also will hopefully be making little chocolates (using molds), and putting them alongside the cake pops as gifts!
I am super, super excited for this, and have no doubt that I'll be posting like crazy about my baking adventures!
That's all for now, readers!

Friday, 7 December 2012
Tuesday, 27 November 2012
My Personal Brand Logo
Hey readers!
So, last night I decided to whip up a logo for myself, as part of my personal branding assignment for advertising.
After looking at a couple references, I decided to use Adobe Illustrator to make it. I've used Photoshop and inDesign, but I've never really used Illustrator - but I figured it wouldn't be too much different.
It ended up going pretty well. The program is very similar to inDesign, but it has more detailed drawing and shape functions. I didn't really do any drawing for it, but the major difference that I used is that you can make the lines from the pen tool taper off, which was awesome.
I kind of knew what I wanted to do ahead of time. My original design that I doodled out was just the side-by-side K and F, with the D and I in the middle (as they're my middle names, derp). I also wanted to have my "pop of colour" theme in the logo, and decided to do so by making the D and I different colours. But after doing so, I felt that it needed more, so I created little swirly designs coming off of the D and I, then added some happy bubbles.
I really like how it turned out, considering it's my first attempt at using Illustrator and logo design. I'll likely edit it more in the future though.
 (P.S. The details are a lot more visible in the PDF and vector files, the JPEG and TIFFs just kinda butchered it. xP )
So, last night I decided to whip up a logo for myself, as part of my personal branding assignment for advertising.
After looking at a couple references, I decided to use Adobe Illustrator to make it. I've used Photoshop and inDesign, but I've never really used Illustrator - but I figured it wouldn't be too much different.
It ended up going pretty well. The program is very similar to inDesign, but it has more detailed drawing and shape functions. I didn't really do any drawing for it, but the major difference that I used is that you can make the lines from the pen tool taper off, which was awesome.
I kind of knew what I wanted to do ahead of time. My original design that I doodled out was just the side-by-side K and F, with the D and I in the middle (as they're my middle names, derp). I also wanted to have my "pop of colour" theme in the logo, and decided to do so by making the D and I different colours. But after doing so, I felt that it needed more, so I created little swirly designs coming off of the D and I, then added some happy bubbles.
I really like how it turned out, considering it's my first attempt at using Illustrator and logo design. I'll likely edit it more in the future though.
Friday, 23 November 2012
Random Drawing Moods
Hello, readers!
Every now and then, I have random days where there's only one thing I really want to do: Draw.
Yesterday was one of those days.
In my advertising class, we were given a brief assignment where we had to design a billboard advertising the (fake) end of the NHL lockout. I realized that I actually had my clipboard with blank paper on it with me, as I had brought the clipboard in order to do surveys earlier in the day.
After finishing my design a little early, I decided to do a bit of drawing until class finished. It was just a messy pen sketch of a girl, but it made me kind of happy, and it ended up getting me into a drawing mood.
Unfortunately, when I got home, I really didn't have any free time. After listening to my mom talk to me for about an hour, I went to get supper, then went back home only to have to write a 1000 word essay.
1000 words? That might seem easy, but not so much when it's a personal essay. I simply had too much to say. But I recalled my teacher telling the class that it wouldn't be a big deal if we went over the word count, as long as it wasn't obscenely long. He also said that 1000 word essay somehow amounted to a solid four pages, but even with my 1200 word essay I only had about 3 1/2.
Anyway, back to the point, this took me until about 11pm to finish - the time that I usually go to bed. But then I began staring at my desktop background:

I was suddenly overcome with a need to draw the photo.
I originally attempted to draw Cedric (on the left), thinking that it would be more challenging. But it ended up looking pretty terrible, and I didn't feel like trying to fix it anymore - so instead began to draw Omar.
I put a little bit of my own style into it, but was determined to keep the brunt of the high-contrast style of the original the same. In about 20 minutes, I ended up with what I thought was a pretty good rendition of the photo. I only did the face, as I did not feel like guessing what was going on with his clothing nor did I want to draw the full afro, but I was still really happy with it.

Every now and then, I have random days where there's only one thing I really want to do: Draw.
Yesterday was one of those days.
In my advertising class, we were given a brief assignment where we had to design a billboard advertising the (fake) end of the NHL lockout. I realized that I actually had my clipboard with blank paper on it with me, as I had brought the clipboard in order to do surveys earlier in the day.
After finishing my design a little early, I decided to do a bit of drawing until class finished. It was just a messy pen sketch of a girl, but it made me kind of happy, and it ended up getting me into a drawing mood.
Unfortunately, when I got home, I really didn't have any free time. After listening to my mom talk to me for about an hour, I went to get supper, then went back home only to have to write a 1000 word essay.
1000 words? That might seem easy, but not so much when it's a personal essay. I simply had too much to say. But I recalled my teacher telling the class that it wouldn't be a big deal if we went over the word count, as long as it wasn't obscenely long. He also said that 1000 word essay somehow amounted to a solid four pages, but even with my 1200 word essay I only had about 3 1/2.
Anyway, back to the point, this took me until about 11pm to finish - the time that I usually go to bed. But then I began staring at my desktop background:
.jpg)
I was suddenly overcome with a need to draw the photo.
I originally attempted to draw Cedric (on the left), thinking that it would be more challenging. But it ended up looking pretty terrible, and I didn't feel like trying to fix it anymore - so instead began to draw Omar.
I put a little bit of my own style into it, but was determined to keep the brunt of the high-contrast style of the original the same. In about 20 minutes, I ended up with what I thought was a pretty good rendition of the photo. I only did the face, as I did not feel like guessing what was going on with his clothing nor did I want to draw the full afro, but I was still really happy with it.

I began with the outline of the profile, and the line between the lips. I began my shading at the nose - I've recently started to find this a good place to begin. I spent most of my time focusing around the nose and lips. After a while of stupidly careful shading, I decided it would be easier to instead get right to the outline of the sunglasses, then draw a light outline of where my shading will be. As I finished major components of the shading, I smudged out the edges of the shading into the rest of the face just using my finger.
TIP: When doing dark shading, try to keep in mind the actual outline of things - for example the sunglasses. I am also very picky about the facial outline - I like it to be noticeable, but not too much. I like the shading right beside the facial outline to be only a shade or two lighter.
As for the hair, I worked on it whenever I came to a part where there would be hair. I was kind of lazy like that. I also made an effort to distinguish the hair from the face, without making it too separate from the body - the little hairs at the sideburns were particularely tricky, as I wanted them to be dark enough that they wouldn't just look like shading, but light enough that you could see all the individual strands in a really awkward way.
If you have any questions or comments, feel free to let me know!
By for now, readers.
Friday, 16 November 2012
I promise to draw soon.
Hello, readers!
So, I realize that I've been slacking off with my drawing lately, I apologize.
I was actually planning on doing another concept sketch for another Aiko mascot entry yesterday, but I ended up spending an obscene amount of time aquiring a new laptop. I was planning on it just being a quick trip, but not only did I manage to catch the most crack-inspired, long-winded bus route ever, but the employee at Future Shop ended up telling me the entire history of IBM and Lenovo.
I'm hoping that I might be able to scrounge up some time this weekend to sketch out some ideas, which I will then post here to discuss the process I go through when doing full, detailed sketches.
Bye for now!
Friday, 9 November 2012
Things Have Been Crazy - At Least I Can Write
Hello, readers.
CreComm makes your life a little crazy.
Even when you don't have anything to work on, you're sitting there thinking, "WHY DON'T I HAVE ANYTHING TO WORK ON?"
That's exactly what I did last night. Then I realized, I do have stuff to work on. Sort of. A lot of the assignments we receive - particularly for journalism - are ones that we know are due in less than a week, but that we also know we can't work on until a certain point. At this point in time, I am referring to our Remembrance day assignments, which, obviously, we have to wait until Remembrance day to write.
By the way, this CreComm craziness is why I haven't posted anything about my art lately. Drawing is a very relaxed thing for me, so I don't like to do it when I feel like I have a million other things to do. You might think, "Well, if it's relaxing, why don't you do it to relax yourself?"
But no. I don't know why, but that's just not how I roll.
The good thing about this craziness is that in amongst it all, I've been writing, due to my creative writing class. And oh, man, do I love to write. Being a writer as I am though, I'm also extremely lazy about it. Writers and artists are probably some of the biggest procrastinators out there. And I'm both.
For example, look at the artists at conventions. Many of them will have wonderful displays and wonderful art (obviously), but what you don't know is that they more than likely did the brunt of that work in maybe a month or two - or less - before the convention. Those who do conventions professionally - as in they put buttloads of work into it and make buttloads of money - probably take more time, but casual artists, not so much.
This year I took a little bit more time to prepare - as I had 20+ masks to make - but note that by "a little more time" I mean that I started about a month to a month and a half before the convention rather than two weeks.
Anyway, sorry for the little detour there. My point today is that although things have been kind of crazy, at least I do have one little vent-box that is my writing. And, being that these are assignments, I am forced to write.
For my last assignment, I even decided to whip out my old, beloved character, Aiden. I created Aiden about four years ago now, I believe. I am very attatched to him, as he kind of represents the sort of darkness inside me. I know that sounds a little dramatic and cliche, but it's true.
You can find my most recent story, To Lucy, With Grace, on my DeviantArt.
That's all for now, Readers!
Friday, 2 November 2012
Shameful, or Shameless: Just a Kid at Heart
Good day, readers.
So, on October 30th, I turned 18 years old at last. And on October 31st, I went trick-or-treating.
I didn't go alone, mind you. I went with my friend who will be turning 18 in December, and my boyfriend who will be 19 in December (they have the same birthday, actually!).
I have never missed a Halloween. It is my absolute favourite holiday. I mean, why wouldn't it be - I get gifts one day and candy the next.
Now, ever since I was about 15, people have started saying to me "Aren't you kinda old for that?" To which I respond, "Nah, it's just fun!"
And it really is! And you know what? The only people that seem to accuse me of being too old are the people I talk to about it. When I actually go out for Halloween, honestly - no one cares. As long as you put effort into it and its obvious you're just out to have a good time, people will still give you candy.
The only thing I've had change is that people will stop me to talk to me about my awesome costume, and there might be one or two people that say that for the older ones they ask for a trick before they give out treats. So I tell them a nerdy joke, and all is well!
This Halloween though, I received a slightly hurtful comment from my aunt, who has always been very supportive of me otherwise. She posted on my Facebook, "Tricks are for kids. You're an adult now."
But you know what? Just because I'm 18, doesn't mean I can't still be a kid at heart. I like to dress up. I like to have fun, and I like to get free candy.
I will stop trick-or-treating only when I have no one to go with, people start getting crabby at me at the door, or I get bored of it.
Simple as that.
Wednesday, 24 October 2012
Ai-Kon Mascot Contest
Good day, readers!
In Winnipeg, there is an anime convention every summer called Ai-Kon. I've been going to it since 2005, and although I wouldn't really consider myself an anime fan anymore, I still really love going to the convention. It's a really fun environment, with a lot of really great people who are just as nerdy as I am.
In the past few years, partially due to my dwindling interest in the anime part of the convention, I have become one of the frequenting artists. By this I mean for.. I think three years straight now I've had my own art table with my own art to sell to the attendees.
On a related note, the convention also has a mascot, "Aiko". Each year they hold a contest for artists, where they draw Ai-Kon according to their very open guidelines (Pink hair, blue eyes, cheerful, family-friendly), and in recent years in accordance to the theme. First prize is a free full art table, free admission, and an Ai-Kon t-shirt (which has your art on it!). The two runner-ups get a free half table.
I have entered the contest twice now, with not much luck. But this year, I think I've got a real chance.
The 2013 theme is "warrior", which gave me immediate inspiration. The contest was only announced Sunday evening, but by the end of the next day, I had already finished my sketch, lineart, and most of my base colours.
Here's a bit of a walk-through of what I did.
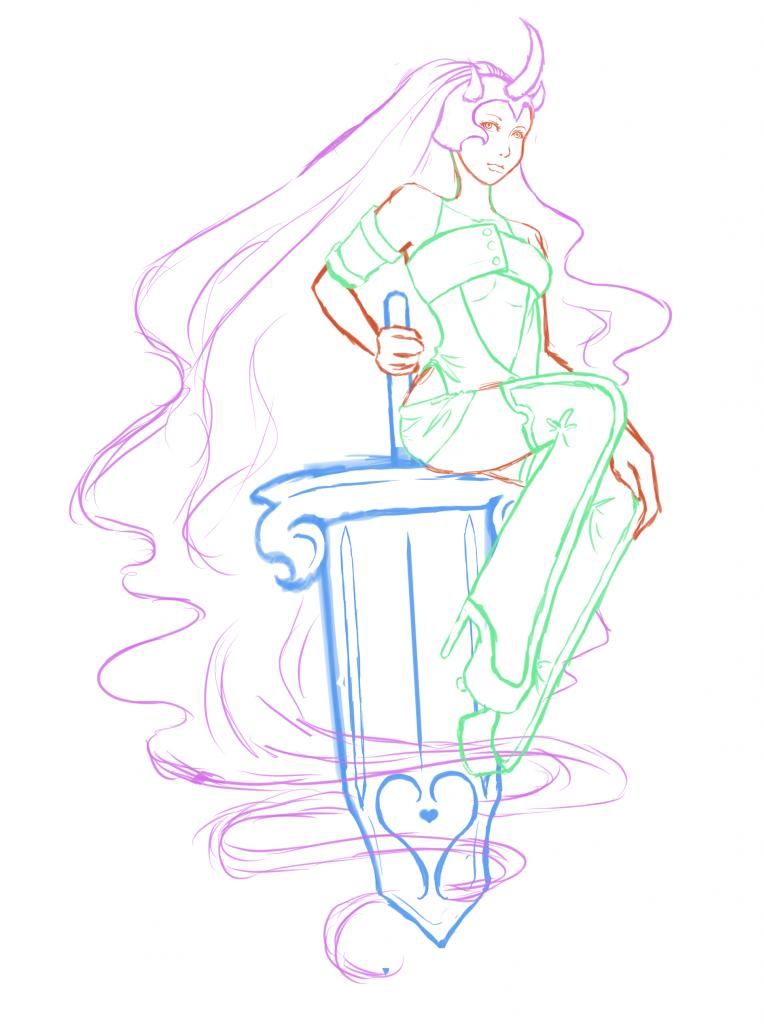
I started with a sketch, done on PaintToolSai. I use this program primarily for my lineart, and occasionally for colour. I greatly prefer this program over Photoshop when it comes to crisp, clean lines (without being vector).

I sketch the entire body alone first (meaning no clothing).This way, when I do get to the clothing, I know exactly where to place it and how to drape it, as I already know what the body is doing and don't have to fight with proportions and clothing at the same time. I did draw the sword early though - this is because I couldn't draw the right hand before drawing the sword.
I've recently started drawing each different part of my sketch on a different layer and in a different colour. Things get messy during the sketching, and this just helps make a nice, clean sketch. You can differentiate between all of your mangled lines, and easily erase one line without being concerned about the others.
Once I have things the way I want them in my sketch, I erase my base body lines that have become unnecessary. As I mentioned in my post Faces: Simple as Circles, I find extra lines to be very annoying and distracting.
Once all my sketching is complete, I go around and clean up messy and confusing part, so that I know exactly what I'm doing when I start my lineart. Once this is finished, I end up with something like my above photo.
Next up is the lineart!
This, of course, I also do on PaintToolSai, with just the brush tool.
There's not a lot that I have to say about this - it's really just tracing.
Tips:
- Take your time! It's easy to tell if you've rushed a line.
- Don't think that every line has to be done in one shot. Many of my line are actually a multitude of lines that I've just magically merged together!
- The eraser and ctrl+z are your friends. This is the best part of digital art. Use them well.
So, yeah. This is how my lineart turned out!


In Winnipeg, there is an anime convention every summer called Ai-Kon. I've been going to it since 2005, and although I wouldn't really consider myself an anime fan anymore, I still really love going to the convention. It's a really fun environment, with a lot of really great people who are just as nerdy as I am.
In the past few years, partially due to my dwindling interest in the anime part of the convention, I have become one of the frequenting artists. By this I mean for.. I think three years straight now I've had my own art table with my own art to sell to the attendees.
On a related note, the convention also has a mascot, "Aiko". Each year they hold a contest for artists, where they draw Ai-Kon according to their very open guidelines (Pink hair, blue eyes, cheerful, family-friendly), and in recent years in accordance to the theme. First prize is a free full art table, free admission, and an Ai-Kon t-shirt (which has your art on it!). The two runner-ups get a free half table.
I have entered the contest twice now, with not much luck. But this year, I think I've got a real chance.
The 2013 theme is "warrior", which gave me immediate inspiration. The contest was only announced Sunday evening, but by the end of the next day, I had already finished my sketch, lineart, and most of my base colours.
Here's a bit of a walk-through of what I did.
I started with a sketch, done on PaintToolSai. I use this program primarily for my lineart, and occasionally for colour. I greatly prefer this program over Photoshop when it comes to crisp, clean lines (without being vector).
I sketch the entire body alone first (meaning no clothing).This way, when I do get to the clothing, I know exactly where to place it and how to drape it, as I already know what the body is doing and don't have to fight with proportions and clothing at the same time. I did draw the sword early though - this is because I couldn't draw the right hand before drawing the sword.
I've recently started drawing each different part of my sketch on a different layer and in a different colour. Things get messy during the sketching, and this just helps make a nice, clean sketch. You can differentiate between all of your mangled lines, and easily erase one line without being concerned about the others.
Once I have things the way I want them in my sketch, I erase my base body lines that have become unnecessary. As I mentioned in my post Faces: Simple as Circles, I find extra lines to be very annoying and distracting.
Once all my sketching is complete, I go around and clean up messy and confusing part, so that I know exactly what I'm doing when I start my lineart. Once this is finished, I end up with something like my above photo.
Next up is the lineart!
This, of course, I also do on PaintToolSai, with just the brush tool.
There's not a lot that I have to say about this - it's really just tracing.
Tips:
- Take your time! It's easy to tell if you've rushed a line.
- Don't think that every line has to be done in one shot. Many of my line are actually a multitude of lines that I've just magically merged together!
- The eraser and ctrl+z are your friends. This is the best part of digital art. Use them well.
So, yeah. This is how my lineart turned out!
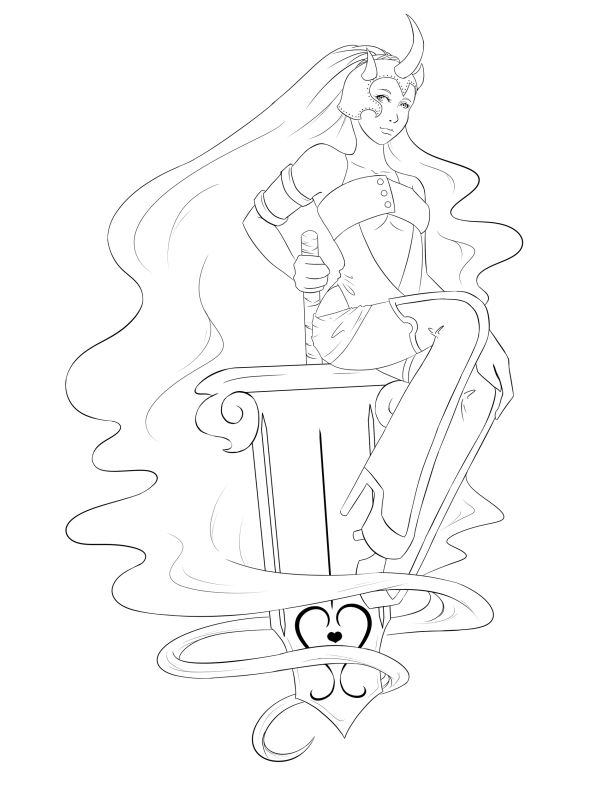
I was extremely happy with this outcome. I honestly feel like this is my best drawing yet! I'm still not the best with facial expressions, but at least the rest looks awesome!
I was planning on stopping there for the night, but I was just too caught up in my excitement. So I switched over to Photoshop CS for my colouring.
I knew that if I started doing some serious colouring, I wouldn't be able to stop. So instead I decided to just do my base colours to get a sense of it all. I like to know where I'm going before I start something.
So, here we are:
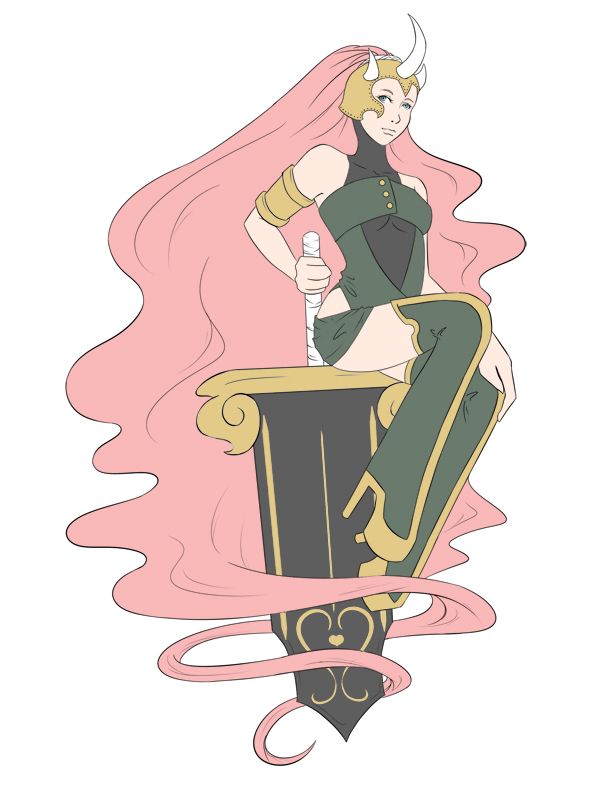
The base colours aren't quiiiite finished yet, but I'm still very happy. The colours are a bit dull though - I played around a lot, but Photoshop wouldn't let me do colour adjustments to the entire image. So, sadly, I will have to wait until I finish everything to do that.
That's about all I have for now, readers. I will keep you posted on my progress, and of course the results of the contest! Winning first place will save me almost 100$, so I reeeeally hope I get it this year!
If you have any questions or comments on my process, don't hesitate to post here!
Bye for now, readers!
Thursday, 18 October 2012
A Beginner's Attempt at Sewing
So, over the summer, I made a decision that with my money from Ai-Kon sales I would buy a sewing machine and learn to sew!
My decision to do this was inspired by the fact that I love to cosplay, but the cost to buy cosplays is rediculous. (For more information on cosplay, go here and here)
I've had the sewing machine since August, but it's taken me a while to actually put it to use. I also spent some time trying to figure out what I should have as my first projects.
First up, I have Batwoman, for Halloween and hopefully Comic-con. I bought the cat suit - as there was no way I was making one of those on my first try - and planned to make all the accessories (gloves, belt, batsymbol, boot covers) using red vinyl.
Last night, I actually started! But, alas, it did not go so well. Although I have sewn a small amount in the past, I have never done it without someone with me.
So, I decided to start with the belt, because I figured it would be the easiest. So I cut out my first piece, measuring myself for the length and making it five inches wide (for seam allowance!). But, some how, I got my measurement wrong and made it waaaay too short. I didn't want to waste my vinyl, so I decided to just cut out what I would need to make it the right length and sew it together.
This part worked out fine!


As you can see the thread is not the right colour.. I forgot to change it from my test thread before hand, but it didn't matter anyway because it won't be seen! I did change the thread and the bobbin to red after, though.
From there, everything went down hill.
I pinned everything, and that went fine, although it was a little awkward over the seam I made. It was went I tried to start sewing that where the problems happened.
It wouldn't go. It kept kind of getting stuck in the vinyl.

I kept trying and trying, but the basic needle that was in the machine just couldn't handle the vinyl. It broke. D:

My decision to do this was inspired by the fact that I love to cosplay, but the cost to buy cosplays is rediculous. (For more information on cosplay, go here and here)
 |
| My little sewing corner! I moved the mirror, though. Ignore the nerdy pillow my grandma got me. |
First up, I have Batwoman, for Halloween and hopefully Comic-con. I bought the cat suit - as there was no way I was making one of those on my first try - and planned to make all the accessories (gloves, belt, batsymbol, boot covers) using red vinyl.
Last night, I actually started! But, alas, it did not go so well. Although I have sewn a small amount in the past, I have never done it without someone with me.
So, I decided to start with the belt, because I figured it would be the easiest. So I cut out my first piece, measuring myself for the length and making it five inches wide (for seam allowance!). But, some how, I got my measurement wrong and made it waaaay too short. I didn't want to waste my vinyl, so I decided to just cut out what I would need to make it the right length and sew it together.
This part worked out fine!


As you can see the thread is not the right colour.. I forgot to change it from my test thread before hand, but it didn't matter anyway because it won't be seen! I did change the thread and the bobbin to red after, though.
From there, everything went down hill.
I pinned everything, and that went fine, although it was a little awkward over the seam I made. It was went I tried to start sewing that where the problems happened.
It wouldn't go. It kept kind of getting stuck in the vinyl.

I kept trying and trying, but the basic needle that was in the machine just couldn't handle the vinyl. It broke. D:

So, I decided that I would have to wait a little longer to finish my Batwoman costume, as I would need to get a thicker needle first.
A tip for those learning to sew as well: If you're sewing a thick fabric, look into it - you'll probably need to do something different.
Bye for now, readers!
Friday, 12 October 2012
Tip #2: Browse
I know you guys have probably been sitting on the edge of your seats waiting for more tips, right? Well, here's the second!
Tip #2: Browse. All the time.
As an artist - professional, amateur, or beginner - you should always be looking for ways to develop your art.
Notice that I use the word "develop" rather than "improve". I say this because even if your skills have come very far, there are always new and different things happening in the world of art for you to discover.
Part 1: Be a little creepy
Watch people.
Carefully.
I do it all the time.
I have a really good eye for the shapes of bodies, and can take things I see to mind and apply them to my art later.
It happens a lot where I'll simply be on the bus, and I'll see a woman sitting, and I notice the shape of her leg and how it's really elegant or something. So I try to remember that shape, then when I'm drawing a woman, I might remember it and try to draw something similar.
I do the same thing for faces - especially eyebrows and lips - as well as hands, feet, and well - everything! I'm always watching.
It might seem a little creepy, but hey, if you're drawing people, the best thing to do is to observe people.
Part 2: Internet!
In particular: DeviantART.
It's a fantastic website filled with thousands of artists. It has all styles, all levels of skill, everything!
What I suggest even doing is simply taking a stroll now and then through the first page, where they will display the most popular deviations. If you find something you like, go look at it, blow it up, stare at it. Notice the things you like, the things you don't like. Copy it. Either just the style itself, or the entire picture. Copying might seem kind of lame, but it's truly very helpful. Draw it out on paper, and try to make it as similar as possible. Your hand will begin to get used to what you're forcing you to do, and the little things you copy will pop up in your own art.
Tutorials are also fantastic, and DeviantART has tons of them. If you find a really awesome artist you like, go through their gallery and see if they have any tutorials! You can also simply search for specific tutorials - you could probably find one for anything.
Tutorials are incredibly helpful. I look for them all the time. I really enjoy finding out how other people do things. Even if you're not too keen on what the tutorial does, give it a try. You might happen to like something that they do, and you can adapt it and use it for yourself.
So, today, my suggestion to you is to go to DeviantART and just browse around. Search for things that you like. Stare at peoples' art. Make an account of your own!
There are also many, many groups on DeviantART that you can join, make friends, and even get some feedback on your art!
That's all for now, readers!
Monday, 1 October 2012
An Accident Waiting to Happen in Winnipeg
.JPG) |
| As a man tries to cross the street at William and King, cars turn towards him with hardly a care. |
As a student that buses most of the way to school each day, I'd rather not be one of many who has to fear for their life every time I cross the intersection at William and King.
Some consider it jay-walking, I consider it safety precautions. When crossing the north side of the intersection, the only truly safe time to walk is when the hand is telling you to stop. But once the light changes to tell pedestrians to walk, the light changes for the east-bound cars as well. And where do these cars go? Well, they drive towards the pedestrians, of course.
So, if you happen to miss those few seconds of safe-walking, you must simply have faith that today won't be the day that one silly car doesn't notice you standing there and makes a swift turn right towards you.
This intersection has been a danger to pedestrians for years now, and how it hasn't been fixed yet is a wonder. I personally believe that if that little person on the lights is telling me to walk, I should feel safe doing so. After all, an intersection's lights are there to keep both cars and pedestrians safe, right? I would like to think so.
Pedestrians should not be concerned or even afraid to cross the street, unless they're doing so against the light or something of the like. This intersection should not have been allowed to get by like this for so long and needs to be fixed so that drivers, students, workers, and any other pedestrians can feel at ease again.
Bye for now, readers!
Thursday, 27 September 2012
Faces: Simple as Circles
Good day, readers!
So, I figure that before I teach you to draw individual parts of a face, I should start with the face itself - so you have somewhere to put everything.
There is a small problem with this, though. As I have been drawing for.. about eight years now, I can draw a face like it's nothing, it's just becomes kind of natural after a while. Don't worry, if you keep up with it, it will be natural for you too!
Anyway, I figure that explaining to you how I draw faces exactly won't be of much help to you. Why? Because it would basically be "You draw a line this way, then a curvy line this way, then another line and then it's a face!", and your response would be "... Wat?". You would likely end up with a wiggly blob that had a slight, warped appearance of a face.
So, instead, I will be taking old techniques that I used to help teach myself, along with a really helpful technique I picked up from a friend a year or two ago. I don't use it anymore unless I'm really stressing about it, but it is a great technique.
And this technique is, to simply start with... a circle. So draw a circle on your paper - make it pretty big, as you want room for details. It does not have to be perfect, as you can see from my beautifully scribbly lines.
.JPG)
Note: This is a sketch. For now, make sure you're drawing as light as you can, or you'll be screwed over later.
Once you have your circle - if this takes you more than 10 seconds to draw, you're over-thinking it - you can move on to the trickier part. It's a little hard to describe, so just make sure you're comparing what I write to what I drew. Bring two lines down from either side of the circle. Go down in an almost straight line. It's tricky to explain this, as if you make it to directly downwards it could look a little blocky, so try and turn it inwards a tiny bit. Go down just a few centimetres like this. Make sure both lines are about even (you can adjust this later too, that's why we draw lightly!), then angle the lines again and bring them together into the chin.
.JPG)
.JPG)
Drawing guidelines, like above, will also be very helpful. One down the middle, one across the middle, one a quarter way from the bottom (of the circle) and one at the bottom of the circle.
Next, start sketching in the outlines of the facial features, using the lines to aid you in keeping everything symmetrical. Symmetry takes a long time to really master, I still have many problems with it.
.JPG)
.JPG)
Everything there is pretty well explained by my drawings. A couple things I will specify though, are that the ears should go from (approximately) the top of the eyes to the bottom of the nose. Depending on how you've proportioned, following this exactly may make the ears look really big, so adjust as you feel is needed. As for the lips, they go about half way between the nose and the chin.
Once you've vaguely placed everything, you can erase the lines! If you like you can leave them for a while, but I find them messy and distracting.
.JPG) And suddenly, it's starting to look like a face! The rest of the process is kind of stylistic and self-explanatory. I will be going over specific features in future posts!
And suddenly, it's starting to look like a face! The rest of the process is kind of stylistic and self-explanatory. I will be going over specific features in future posts!
.JPG)
.JPG)
.JPG)
.JPG)
.JPG)
So, I figure that before I teach you to draw individual parts of a face, I should start with the face itself - so you have somewhere to put everything.
.JPG) |
| I drew this in about two minutes... |
Anyway, I figure that explaining to you how I draw faces exactly won't be of much help to you. Why? Because it would basically be "You draw a line this way, then a curvy line this way, then another line and then it's a face!", and your response would be "... Wat?". You would likely end up with a wiggly blob that had a slight, warped appearance of a face.
So, instead, I will be taking old techniques that I used to help teach myself, along with a really helpful technique I picked up from a friend a year or two ago. I don't use it anymore unless I'm really stressing about it, but it is a great technique.
And this technique is, to simply start with... a circle. So draw a circle on your paper - make it pretty big, as you want room for details. It does not have to be perfect, as you can see from my beautifully scribbly lines.
.JPG)
Note: This is a sketch. For now, make sure you're drawing as light as you can, or you'll be screwed over later.
Once you have your circle - if this takes you more than 10 seconds to draw, you're over-thinking it - you can move on to the trickier part. It's a little hard to describe, so just make sure you're comparing what I write to what I drew. Bring two lines down from either side of the circle. Go down in an almost straight line. It's tricky to explain this, as if you make it to directly downwards it could look a little blocky, so try and turn it inwards a tiny bit. Go down just a few centimetres like this. Make sure both lines are about even (you can adjust this later too, that's why we draw lightly!), then angle the lines again and bring them together into the chin.
.JPG)
.JPG)
Drawing guidelines, like above, will also be very helpful. One down the middle, one across the middle, one a quarter way from the bottom (of the circle) and one at the bottom of the circle.
Next, start sketching in the outlines of the facial features, using the lines to aid you in keeping everything symmetrical. Symmetry takes a long time to really master, I still have many problems with it.
.JPG)
.JPG)
Everything there is pretty well explained by my drawings. A couple things I will specify though, are that the ears should go from (approximately) the top of the eyes to the bottom of the nose. Depending on how you've proportioned, following this exactly may make the ears look really big, so adjust as you feel is needed. As for the lips, they go about half way between the nose and the chin.
Once you've vaguely placed everything, you can erase the lines! If you like you can leave them for a while, but I find them messy and distracting.
.JPG)
.JPG)
.JPG)
.JPG)
.JPG)
.JPG)
If you have any questions, comments, etc. Just let me know!
P.S., After some consideration, I think I'm going to do my following tutorials digitally. Although I didn't want to do this as I prefer traditional art, it will be be easier to see.
Monday, 17 September 2012
The Great Adventure of our Lives
“The great adventure of our lives. What does it mean to die when you can live until the end of the world? and what is 'the end of the world' except a phrase, because who knows even what is the world itself? I had now lived in two centuries, seen the illusions of one shattered by the other, been eternally young and eternally ancient, possessing no illusions, living moment to moment in a way that made me picture a silver clock ticking in a void: the painted face, the delicately carved hands looked upon by no one, looking out at no one, illuminated by a light which was not a light, like the light by which god made the world before He had made light. Ticking, ticking, ticking, the precision of the clock, in a room as vast as the universe.”

If you can guess where that wonderful quotation (not quote, please never call a quotation a quote!) is from, I applaud you.
If not, I shall tell you now; it is from Anne Rice's first novel of the Vampire Chronicles, The Interview with the Vampire.
I began reading this series... Probably about five years ago, yet sadly, I am only on the third novel, The Queen of the Damned.
Why, you might ask? Well, to put it simply, the first novel is a real bitch to read.
Now, don't get me wrong - the book itself is fantastic. Anne Rice has such beautiful writing, it's hard to find anything of the like.
What makes this book difficult to read is the structure of it. The book is quite literally an interview, with this boy Daniel being the interviewer and Louis de Point du Lac being the interviewee. So, what this means is, Louis will be talking forever and it appears to be a first person narrative, but then Daniel will suddenly jut in periodically throughout the book. I found this to be rather distracting, as it kept me from being too attatched to the story.
So, not only was the book hard to keep focused on, but it (well, all of Anne Rice's books) has so much content that if you stop reading it for a while, you will forget everything that just happened.
 The quote that I began this post with is from the exact spot that I got stuck at for many years. I would read up to here, get distracted, then stop for a while. Note that it is only about a third of the way through the book. I tried many times to just start from that point, but again, I would easily forget everything that preceeded that point.
In the end, I was only able to finish the book on the 16-hour drives to and from Calgary. But man, was it fantastic.
So, to finish off todays post, I'll leave you with this:
The Interview with the Vampire is a great novel by Anne Rice which leads into a fantastic, must-read series. But be warned: It's a summer-read-only kind of book, not a read-it-when-I-happen-to-have-time book.
By for now, readers!
PS: The photos can be found at my old DeviantART account. My new DeviantART account, on the other hand, can be found here. C:
Friday, 14 September 2012
Artists' Tip #1
Good day, readers!
So, I haven't had much of a chance to draw lately, plus when I do the lighting is terrible for photos. That, and I'm waiting for some feedback of what you want to see, readers!
So, today, I've decided to make a first post of what will likely be many that includes tips on drawing. Here we go!
#1: Don't get a tablet yet
For those whose idea of "tablet" is fancy handheld computer-like devices, get that out of your head if you're an artist. In the art world, a tablet is a device that you plug into your computer, and when you draw on it with the provided pens, the action transmits onto your computer screen. When you see awesome digital art, this is what those artists are using.
Now, you may think, "Well, I want to be awesome at drawing, so I'll just get a drawing tablet like the pros!" This is not the best option. I mean, if you really want to, go right ahead - but it won't help you. The best way to learn how to draw is by doing all of your learning with a basic pencil and paper.
Why do I say this? Because, inevitably, drawing with a tablet feels unnatural, especially for beginners. This makes it really difficult to learn. Using non-digital formats is much more natural, and it's easier to just go with the flow. There are even many, many good artists out there who do all their sketches in pencil, then scan it and do the rest on the computer.
Now, don't get me wrong, I myself use a tablet. But only when I have specific digital ideas in mind - I never try to do new things on a tablet. You basically need to have your skills burned into your mind for it to transmit the same onto the computer - it needs to become a habit. If you're still in the figuring-out-your-style phase (I will explain this another time), then a tablet is not for you.
I personally find with most of my amateur artist friends that their traditional work is much better than their digital work. If you wander around any artists faires and look closely between the works, you will notice this as well. Sure, the digital pieces will stand out more, but if you look at the technique itself you will notice the differences.
If, after reading this, you still really want to get a tablet, go right ahead! Just keep in mind that a tablet will not suddenly make your art way better, it's just a good way to emphasize your art.
That's all for today! Stay tuned for more tips!
Bye for now!
Wednesday, 12 September 2012
The New Doctor Who
Hello, dear readers.
In case you don't know, I am a big fan of Doctor Who. And you know what started a week and a bit ago? The seventh series!
I was so excited for the new series to start, and I have to say, the first episode was rather... disappointing, in a way. Not that it was a bad episode. It was just... Very confusing. Characters were semi-introduced that weren't supposed to be introduced yet, and huge things happened that weren't made to be as huge as they really were. And yeah, I was left feeling extremely confused. I mean, overall, it was a good episode.. just confusing.
Last night, I watched the second episode (which aired last Saturday). It was much better than the first. Dinosaurs on a spaceship! It's hard to get that wrong. And - correct me if I'm wrong - I do believe they had CG MONSTERS? I don't think that has ever happened in Doctor Who - they're usually mechanical/people in suits/etc. But, in some scenes, the dinosaurs looked like they were CG. Up close, they obviously were not though. I was still very shocked by this.
The episode also had some little things that showed the Doctor's great love for Amy and Rory - at this point he still is really attatched to them, and it's easy to tell. For example, in the episode he gathers a couple others with him, and Amy asks if "they're the new us", referring to them being the new companions or something. The Doctor responds by saying, "They're just people, they're not Ponds." This to me is the writer trying to build up an even stronger connection to the Ponds by showing the Doctor's care for them, so that it'll be even more sad when they're gone. I'm rather unnexcited for this... Amy is my second favourite companion, next to Rose. She's so clever, I just love it. Which leads me to note my less than excited feelings towards the new companion, Clara. Even her name is rather bland. But, we'll see, I guess. I try not to form complete opinions until I see things. So you never know, I may end up loving her.
I also enjoyed seeing the Doctor act as a real doctor in this episode. I've heard that he is a certified doctor (who would have guessed! : P ), but viewers rarely get to see this in action.
That's about all for now - I may draw something for you guys tomorrow.
Monday, 10 September 2012
Good day to you!
Hello, world of blogging!
I shall start by saying that this is my third attempt at blogging. The difference? This time I'm doing it on something I'm truly interested in writing about and furthering - drawing. I've been drawing for many years now, and am always learning and getting better. Not only that, but I love to teach people too! So, my purpose of this blog will to be to force myself to learn new things (I will be trying to find new things to draw to teach myself), and I will be documenting my process with explainations and tips for those who may want them!
So, to begin my blog, I just drew something random - it's what I tend to doodle during classes, spare time, etc. It's just a semi-realism face. I love to draw faces - especially eyes and lips - as you may learn over the course of this blog.
Drawings never really look like anything when you first start. People always ask me "What are you drawing?" when I've only drawn a line. Just watch, is what I respond.

.JPG)
.JPG)
Next, I draw the nose. I usually start with the nostril closest to the eye I've drawn, to make sure that the nose doesn't intrude on the space that is symbolicly represented by the eye. How far down you place the nose is up to you - I just kind of guess. It won't entirely ruin your picture if you don't do it the way you want to, it'll mostly just affect the shape of the face. It's really just a matter of guessing - better done in pencil.
.JPG)
I also have the lips drawn here. I start with that little divet between the top lip and the nose - this gives me a sense of where to actually place the lips, so that they're not to close or too far from the nose. Make sure not to emphasize this divet too much, or it will end up looking like a moustache...
Next, I draw the line created by the top and bottom lip. This structures the shape of the mouth - smiling, sad, neutral. Next comes the bottom lip, then the top. These are all up to style - go look at pictures of people, artists, stare at people on the bus.
NOTE: A big part of learning to draw is staring at examples of what you want to draw. Look around at real things around you, or look at other artists work to see how they interpret the world.
Lastly, fill in the rest of your details. Emphasize lines that are more important, fill in spaces... It's all up to you and your personal style that you will develop.
.JPG)
Once finished the facial details, I start to draw the outline around it. It didn't work so well this time around, so this is the last photo I'll show you. I'll create a better example another time.
That's all for now, folks. If you have any questions, comments, anything you would like me to go into more depth for - please let me know! I will also be posting a poll soon for things you may want to see in the future.
By for now, readers.
I shall start by saying that this is my third attempt at blogging. The difference? This time I'm doing it on something I'm truly interested in writing about and furthering - drawing. I've been drawing for many years now, and am always learning and getting better. Not only that, but I love to teach people too! So, my purpose of this blog will to be to force myself to learn new things (I will be trying to find new things to draw to teach myself), and I will be documenting my process with explainations and tips for those who may want them!
So, to begin my blog, I just drew something random - it's what I tend to doodle during classes, spare time, etc. It's just a semi-realism face. I love to draw faces - especially eyes and lips - as you may learn over the course of this blog.
Drawings never really look like anything when you first start. People always ask me "What are you drawing?" when I've only drawn a line. Just watch, is what I respond.

I like to start with the eyes. It's a good focal point for me. When I took a sort-of-drawing-class in 5th grade, we were told that it's best to start with the nose - but I always had really terrible proportioning when I did this. Try starting with different things - the eyes, the nose, the lips, the facial outline - to see what works best for you. When I'm drawing more of the body, I often start with the facial outline, as I have a tendancy to draw the body before the face - that way I get a sense of what expression to give to the face.
Always draw an outline first, don't try to super detail as you go, it will make it messy and confusing. Especially if you're drawing in pen.
SIDE NOTE: Don't be afraid to be really sketchy when drawing in pen - it's almost impossible to do otherwise, as you cannot erase.
.JPG)
Once you have an outline of something, it is then safe to start filling in some details, as long as you know what you're aiming for. Sometimes I have an actual goal in my drawing, sometimes I just let my writing utensil take me where it may. This time I went for a female eye.
.JPG)
When drawing female eyes, keep in mind what makes female and male eyes different - I will make a seperate post about the differences later on. For this specifically, I gave the eye long, curled eyelashes, a larger iris and a larger, rounder shape. The eyebrow is lean and shapely. These are some characteristics of drawing that make a feminine character more feminine.Next, I draw the nose. I usually start with the nostril closest to the eye I've drawn, to make sure that the nose doesn't intrude on the space that is symbolicly represented by the eye. How far down you place the nose is up to you - I just kind of guess. It won't entirely ruin your picture if you don't do it the way you want to, it'll mostly just affect the shape of the face. It's really just a matter of guessing - better done in pencil.
.JPG)
I also have the lips drawn here. I start with that little divet between the top lip and the nose - this gives me a sense of where to actually place the lips, so that they're not to close or too far from the nose. Make sure not to emphasize this divet too much, or it will end up looking like a moustache...
Next, I draw the line created by the top and bottom lip. This structures the shape of the mouth - smiling, sad, neutral. Next comes the bottom lip, then the top. These are all up to style - go look at pictures of people, artists, stare at people on the bus.
NOTE: A big part of learning to draw is staring at examples of what you want to draw. Look around at real things around you, or look at other artists work to see how they interpret the world.
Lastly, fill in the rest of your details. Emphasize lines that are more important, fill in spaces... It's all up to you and your personal style that you will develop.
.JPG)
Once finished the facial details, I start to draw the outline around it. It didn't work so well this time around, so this is the last photo I'll show you. I'll create a better example another time.
That's all for now, folks. If you have any questions, comments, anything you would like me to go into more depth for - please let me know! I will also be posting a poll soon for things you may want to see in the future.
By for now, readers.
Subscribe to:
Comments (Atom)