Pages

Wednesday 24 October 2012

Ai-Kon Mascot Contest

Good day, readers!

In Winnipeg, there is an anime convention every summer called Ai-Kon. I've been going to it since 2005, and although I wouldn't really consider myself an anime fan anymore, I still really love going to the convention. It's a really fun environment, with a lot of really great people who are just as nerdy as I am.

In the past few years, partially due to my dwindling interest in the anime part of the convention, I have become one of the frequenting artists. By this I mean for.. I think three years straight now I've had my own art table with my own art to sell to the attendees.

On a related note, the convention also has a mascot, "Aiko". Each year they hold a contest for artists, where they draw Ai-Kon according to their very open guidelines (Pink hair, blue eyes, cheerful, family-friendly), and in recent years in accordance to the theme. First prize is a free full art table, free admission, and an Ai-Kon t-shirt (which has your art on it!). The two runner-ups get a free half table.

I have entered the contest twice now, with not much luck. But this year, I think I've got a real chance.

The 2013 theme is "warrior", which gave me immediate inspiration. The contest was only announced Sunday evening, but by the end of the next day, I had already finished my sketch, lineart, and most of my base colours.

Here's a bit of a walk-through of what I did.

I started with a sketch, done on PaintToolSai. I use this program primarily for my lineart, and occasionally for colour. I greatly prefer this program over Photoshop when it comes to crisp, clean lines (without being vector).


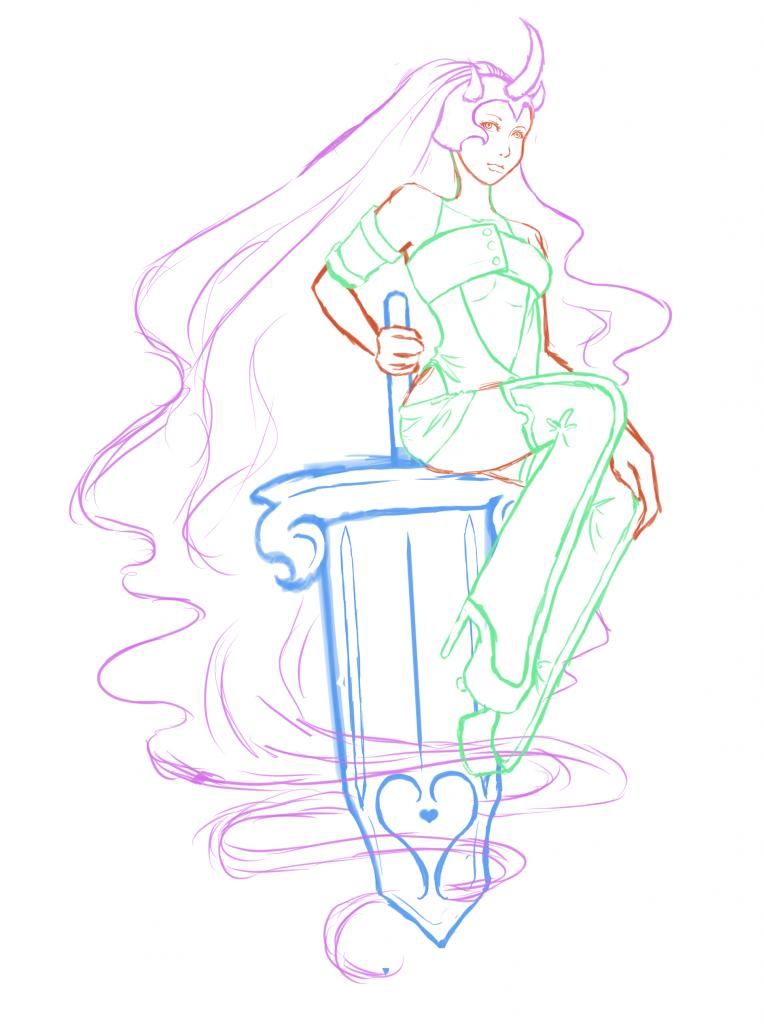
I sketch the entire body alone first (meaning no clothing).This way, when I do get to the clothing, I know exactly where to place it and how to drape it, as I already know what the body is doing and don't have to fight with proportions and clothing at the same time. I did draw the sword early though - this is because I couldn't draw the right hand before drawing the sword.

I've recently started drawing each different part of my sketch on a different layer and in a different colour. Things get messy during the sketching, and this just helps make a nice, clean sketch. You can differentiate between all of your mangled lines, and easily erase one line without being concerned about the others.

Once I have things the way I want them in my sketch, I erase my base body lines that have become unnecessary. As I mentioned in my post Faces: Simple as Circles, I find extra lines to be very annoying and distracting.

Once all my sketching is complete, I go around and clean up messy and confusing part, so that I know exactly what I'm doing when I start my lineart. Once this is finished, I end up with something like my above photo.

Next up is the lineart!

This, of course, I also do on PaintToolSai, with just the brush tool.

There's not a lot that I have to say about this - it's really just tracing.

Tips:

- Take your time! It's easy to tell if you've rushed a line.
- Don't think that every line has to be done in one shot. Many of my line are actually a multitude of lines that I've just magically merged together!
- The eraser and ctrl+z are your friends. This is the best part of digital art. Use them well.

So, yeah. This is how my lineart turned out!

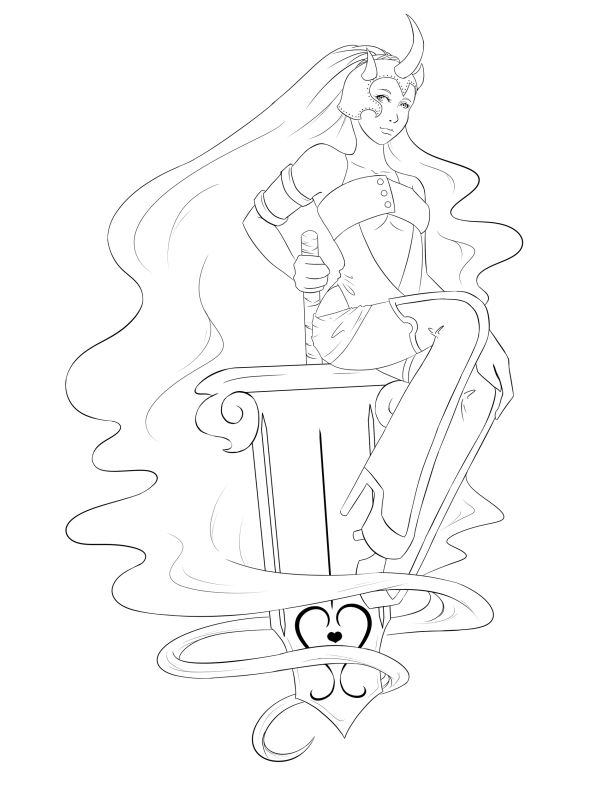
I was extremely happy with this outcome. I honestly feel like this is my best drawing yet! I'm still not the best with facial expressions, but at least the rest looks awesome!
 
 
I was planning on stopping there for the night, but I was just too caught up in my excitement. So I switched over to Photoshop CS for my colouring.
 
I knew that if I started doing some serious colouring, I wouldn't be able to stop. So instead I decided to just do my base colours to get a sense of it all. I like to know where I'm going before I start something.
 
So, here we are:


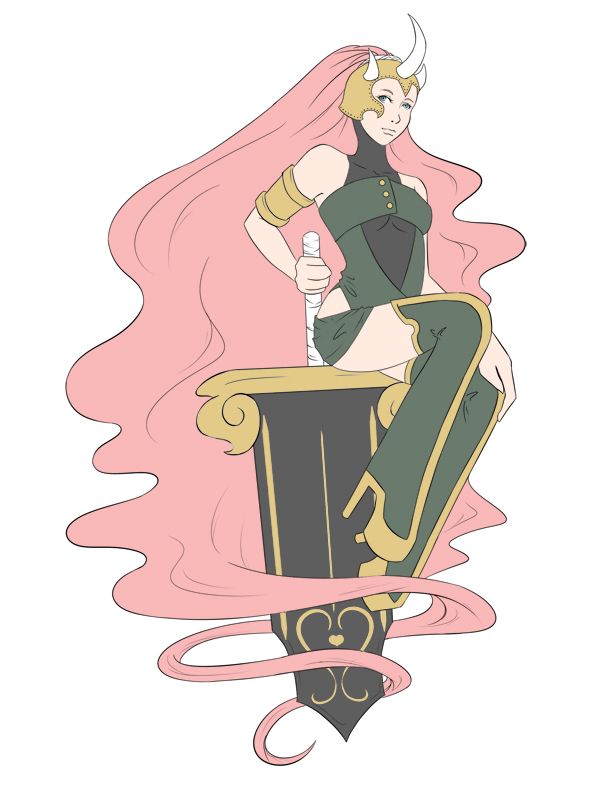
The base colours aren't quiiiite finished yet, but I'm still very happy. The colours are a bit dull though - I played around a lot, but Photoshop wouldn't let me do colour adjustments to the entire image. So, sadly, I will have to wait until I finish everything to do that.


That's about all I have for now, readers. I will keep you posted on my progress, and of course the results of the contest! Winning first place will save me almost 100$, so I reeeeally hope I get it this year!
 
If you have any questions or comments on my process, don't hesitate to post here!
 
 
Bye for now, readers!


Thursday 18 October 2012

A Beginner's Attempt at Sewing

So, over the summer, I made a decision that with my money from Ai-Kon sales I would buy a sewing machine and learn to sew!

My decision to do this was inspired by the fact that I love to cosplay, but the cost to buy cosplays is rediculous. (For more information on cosplay, go here and here)
My little sewing corner! I moved the mirror, though.
Ignore the nerdy pillow my grandma got me.
I've had the sewing machine since August, but it's taken me a while to actually put it to use. I also spent some time trying to figure out what I should have as my first projects.

First up, I have Batwoman, for Halloween and hopefully Comic-con. I bought the cat suit - as there was no way I was making one of those on my first try - and planned to make all the accessories (gloves, belt, batsymbol, boot covers) using red vinyl.


Last night, I actually started! But, alas, it did not go so well. Although I have sewn a small amount in the past, I have never done it without someone with me.

So, I decided to start with the belt, because I figured it would be the easiest. So I cut out my first piece, measuring myself for the length and making it five inches wide (for seam allowance!). But, some how, I got my measurement wrong and made it waaaay too short. I didn't want to waste my vinyl, so I decided to just cut out what I would need to make it the right length and sew it together.

This part worked out fine!


As you can see the thread is not the right colour.. I forgot to change it from my test thread before hand, but it didn't matter anyway because it won't be seen! I did change the thread and the bobbin to red after, though.

From there, everything went down hill.

I pinned everything, and that went fine, although it was a little awkward over the seam I made. It was went I tried to start sewing that where the problems happened.

It wouldn't go. It kept kind of getting stuck in the vinyl.


I kept trying and trying, but the basic needle that was in the machine just couldn't handle the vinyl. It broke. D:


So, I decided that I would have to wait a little longer to finish my Batwoman costume, as I would need to get a thicker needle first.
 
 
A tip for those learning to sew as well: If you're sewing a thick fabric, look into it - you'll probably need to do something different.


Bye for now, readers!

Friday 12 October 2012

Tip #2: Browse

I know you guys have probably been sitting on the edge of your seats waiting for more tips, right? Well, here's the second!

Tip #2: Browse. All the time.

As an artist - professional, amateur, or beginner - you should always be looking for ways to develop your art.

Notice that I use the word "develop" rather than "improve". I say this because even if your skills have come very far, there are always new and different things happening in the world of art for you to discover.

Part 1: Be a little creepy

Watch people.

Carefully.

I do it all the time.

I have a really good eye for the shapes of bodies, and can take things I see to mind and apply them to my art later.

It happens a lot where I'll simply be on the bus, and I'll see a woman sitting, and I notice the shape of her leg and how it's really elegant or something. So I try to remember that shape, then when I'm drawing a woman, I might remember it and try to draw something similar.

I do the same thing for faces - especially eyebrows and lips - as well as hands, feet, and well - everything! I'm always watching.

It might seem a little creepy, but hey, if you're drawing people, the best thing to do is to observe people.


Part 2: Internet!

In particular: DeviantART.

It's a fantastic website filled with thousands of artists. It has all styles, all levels of skill, everything!

What I suggest even doing is simply taking a stroll now and then through the first page, where they will display the most popular deviations. If you find something you like, go look at it, blow it up, stare at it. Notice the things you like, the things you don't like. Copy it. Either just the style itself, or the entire picture. Copying might seem kind of lame, but it's truly very helpful. Draw it out on paper, and try to make it as similar as possible. Your hand will begin to get used to what you're forcing you to do, and the little things you copy will pop up in your own art.

Tutorials are also fantastic, and DeviantART has tons of them. If you find a really awesome artist you like, go through their gallery and see if they have any tutorials! You can also simply search for specific tutorials - you could probably find one for anything.

Tutorials are incredibly helpful. I look for them all the time. I really enjoy finding out how other people do things. Even if you're not too keen on what the tutorial does, give it a try. You might happen to like something that they do, and you can adapt it and use it for yourself.


So, today, my suggestion to you is to go to DeviantART and just browse around. Search for things that you like. Stare at peoples' art. Make an account of your own!

There are also many, many groups on DeviantART that you can join, make friends, and even get some feedback on your art!


That's all for now, readers!

Monday 1 October 2012

An Accident Waiting to Happen in Winnipeg

As a man tries to cross the street at William and King, cars turn towards him with hardly a care.
As a student that buses most of the way to school each day, I'd rather not be one of many who has to fear for their life every time I cross the intersection at William and King. 
 
Some consider it jay-walking, I consider it safety precautions. When crossing the north side of the intersection, the only truly safe time to walk is when the hand is telling you to stop. But once the light changes to tell pedestrians to walk, the light changes for the east-bound cars as well. And where do these cars go? Well, they drive towards the pedestrians, of course.
 
So, if you happen to miss those few seconds of safe-walking, you must simply have faith that today won't be the day that one silly car doesn't notice you standing there and makes a swift turn right towards you.
 
This intersection has been a danger to pedestrians for years now, and how it hasn't been fixed yet is a wonder. I personally believe that if that little person on the lights is telling me to walk, I should feel safe doing so. After all, an intersection's lights are there to keep both cars and pedestrians safe, right? I would like to think so.
 
Pedestrians should not be concerned or even afraid to cross the street, unless they're doing so against the light or something of the like. This intersection should not have been allowed to get by like this for so long and needs to be fixed so that drivers, students, workers, and any other pedestrians can feel at ease again.


Bye for now, readers!